I do not depend
of rolled tape loops. Too often the work falls down in a day or
two.
To support
heavy flat works on paper
I make simple two-piece vertical masking tape hangers.
Masking tape adhesive should not be used for a long term display
because the adhesive remains chemically active. Over time it will
discolor the wall and the artwork that it comes in contact with.
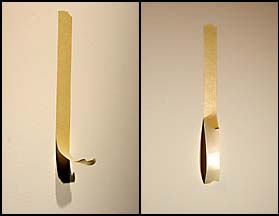
EXAMPLE
1. For an 18 x 24 mat - I decide where I want the top edge to be
on the wall.
| 2.
Near the right and left side near the top, but where it will
be hidden by the mat, I burnish a 7 inch vertical strip of tape to the
wall, glass, or whatever surface can tolerate masking tape. Be
sure to have clean dry surface. If there is condensation, I do a
good pre wiping with a dry paper towel and attach the tape immediately
before new moisture condenses. |
|
3.
I do not attach the bottom inch of tape, but stick a second
strip of tape behind it with the sticky side facing me. This one
inch of face to face adhesive is very strong. I make the adhesive
that faces me about 4 inches long. This give me a 11 inch hanger
with 6 inches burnished to the wall or glass and 4 inches of adhesive
facing me. |
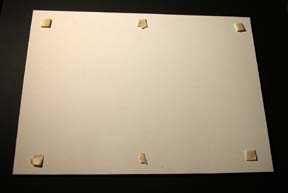
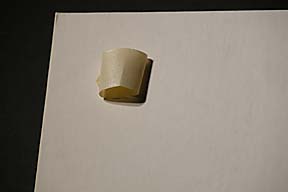
4. I add a few typical rolls (small loops with adhesive facing
out) of tape to the back of my mat along
the top, bottom, and sides. These are not to hold weight, but
they help
keep the work flat to wall.
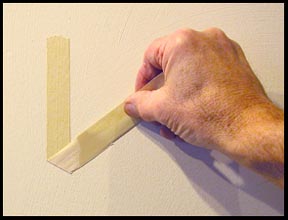
5. I position the work against the wall and I burnish it against
the adhesive of the sticky hangers previously attached
to the wall. The vertical
hangers support the weight while the tape rolls keep it flat. I tug
town on it a bit to check that I burnished (rubbed) it sufficiently at
the right places to really hold the weight.
6.
While two hangers hold on most surfaces, I often make the system
stronger by using wider or longer tape and by using more than two
hangers per work. For long term displays I use at least four
hangers plus the standard tape roles to keep it flat. Displays longer than two months should be mounted with
better materials. Masking tape adhesives dry out and/or stain the wall and the artwork if left on too long.
7. For a particularly difficult or heavy object, duct tape can be used
the same way, but the adhesive may not come off of some painted
walls. See note below for removing adhesive from glass and from
enameled surfaces that can withstand the solvent treatment.
Removing tape without
peeling paint off the wall.
Paint is least apt to
be damaged when I roll it flat back along the surface of the wall
while removing. Fold it flat back against the wall before starting to pull it off. Paint
is most likely to come off
when I remove tape by pulling it straight away from the wall. When
removing art work from the wall, do not pull it away from the wall, but
slide the work straight up the wall to peel the tape tape off with less
damage to the wall and the back of the artwork.
How
to remove the
sticky stuff from
glass, enamel painted, or well coated varnished, surfaces (not for flat
latex wall paint unless you can touch up with paint).
I use WD40 spray lubricant as an
adhesive solvent. Spray it on and let is set to soak a few
minutes. I use Windex and paper toweling to remove the smeary
stuff after the adhesive is removed.
Long
term displays
For archival (long lasting) mounting and hanging use
only archival acid free papers, tapes, adhesives. If you
need something ready at hand, strips of quality typing paper or cotton
cloth can be used with white
glue (Elmer's). It is strong and does not deteriorate, get
brittle, and leave a chemical stain like masking tape. Archival
tape is
best. It is made from white paper or cloth and uses adhesives
that get sticky when
moistened. It is available in some framing shops and in photo supply catalogs.
____________________________
Read about Exhibit Design
Read about Exhibit Awards that Leave No Mind Behind and reward every participant while educating all of us about art and life.
more links__________________
All rights reserved. Images, text, and design
© Marvin Bartel 2004.
An art teacher since 1960.
updated: © 6-27-2008
Parents, pre-school teachers, and art teachers may make one copy for personal study.
Permission is required to make copies, publish, or to post on another web site.
Please
mention the URL or the title of this page in your correspondence with
the author. You may make a link to this page from your page
without permission.
CONTACT HERE
|
|
PAGE CONTENTS
archival
mounting
removing tape
clean-up
adhesive
who
and what to include
help to get the work
done
links
contact
philosophy
It is lots of work to make a nice looking school display of student
artwork, but it has many benefits.
1. Children gain self esteem.
2. Children are motivated to do well.
3. The display is a great place to post the assignment goals.
This is good review and it helps parents and other teachers learn about
the ways artistic thinking is learned. Students who write statements and post them with their work may learn even more.
4. Art teachers gain goodwill and sometimes it becomes easier to get
funds and donations for supplies when they provide work for the walls
of the halls and offices.
All of this is lots of work.
Can students be taught how to help? Initially they need to be
taught the design and assembly skills to design, prepare, and mount
displays of student work.
This is an appropriate part of any art curriculum. Older or more
prepared students can then be assigned to supervise other
students.
What to exhibit?
When selecting work to include, how can we treat all children equally?
Can we either display all the
work or have a fair system of rotation that gives every child's work
the same exposure?
back to top of page ^
On the left we see, "The farmer and his
family looking for their lost horse in the woods." drawing,
crayon, and cut paper.
Emma
Weaver, age 6, 2003
This picture is temporarily taped to
the front of
some black mat board with six loops of masking tape. This is okay
for
the short-term classroom or hallway display. For the longer term
display in the
front office, use better
adhesives.
|